Sprites
Sprites are freely moving small graphics that normally make up the "objects" in the game world (players, enemies, items, etc.). They're also sometimes used for more mundane stuff like the cursor in a menu.
- How sprites are stored
- Setting up the VDP
- Building the sprite table
- Step 1: clearing the table
- Step 2: inserting a sprite
- Step 3: upload table to video memory
- Large sprites
- Sprite limits
- Beware of sprite cache
How sprites are stored
We need to learn how sprite graphics are stored first.
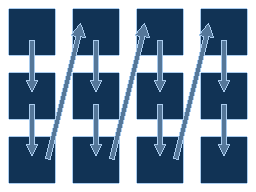
Sprites are made out of tiles. Their size can be anywhere from 1×1 to 4×4 tiles (i.e. 8×8 to 32×32 pixels). Width and height can be set separately, i.e. the sprite doesn't have to be square, it can be rectangular.
Tiles are arranged first vertically then horizontally:

Setting up the VDP
We're going to refer to the labels from the article about setting up the VDP.
First the VDP needs to know where we're going to put the sprite table.
It can be anywhere in VRAM, only restriction is that the address must be
either a multiple of $200 (if 256px wide screen) or
$400 (if 320px wide). In case of doubt, go with the latter.
If you're using the setup code from the VDP
setup page, then the sprite table will be at $F000, so
we may as well use that and move on:
SPRITE_ADDR: equ $F000
If you care more about it: the register that indicates the address is
VDP register $85xx (aka
VDPREG_SPRITE). Bits 15-9 of the sprite table address are
put into bits 6-0 of this register, or in other words, we need to shift
the address by 9 bits to the right.
This convenient macro will help us with that:
SetSpriteAddr macro addr
    move.w  #VDPREG_SPRITE|((addr)>>9), (VdpCtrl)
    endm
Then somewhere in your initialization code (possibly replacing the write to the sprite register from the original code):
SetSpriteAddr SPRITE_ADDRBuilding the sprite table
The easiest way to show sprites on screen is to rebuild the whole table from scratch in RAM every frame and copy it to video memory once all sprites have been added.
You will need this somewhere in RAM:
- A buffer for the sprite table (8 bytes × maximum number of sprites, or if you're unsure, just reserve 640 bytes which is the largest it can get)
- Number of sprites (a byte will do), to keep track of how many we have inserted so far
Every frame you would be doing this:
- Clear the sprite table
- Add every sprite to the table
- Upload sprite table to video memory
Step 1: clearing the table
When the frame starts the first thing you need to do is to "clear" the sprite table (our copy in RAM, that is, not the one in video memory).
This one is actually simple:
- Set number of sprites to 0
- Fill the first 8 bytes of the table with 0
The last point is important when showing no sprites.
ClearSprites:
    clr.b   (NumSprites)      ; Reset sprite count
    clr.l   (SpriteTable+0)   ; Clear first entry
    clr.l   (SpriteTable+4)
rtsStep 2: inserting a sprite
Now we're need to do this for every sprite we want. We'll write an
AddSprite subroutine that can be called like this for
every sprite:
    move.w  (SpriteX), d0
    move.w  (SpriteY), d1
    move.w  (SpriteTile), d2
    move.b  (SpriteSize), d3
    bsr     AddSprite
Now onto programming that subroutine. What it needs to do:
- Make sure the sprite is visible (discard it if too far from the screen)
- Make sure you didn't reach the sprites on screen limit (discard it if you did)
- Figure out where the sprite entry will be stored
- Write the sprite entry
On that third one, it goes like this:
address of sprite table + (number of sprites << 3)
And now we can proceed to insert the sprite. We need to write 8 bytes, explanation of each value follows below:
| Size | Description |
|---|---|
| 2 bytes | Y coordinate |
| 1 byte | Sprite size |
| 1 byte | Sprite link |
| 2 bytes | Tile ID and flags |
| 2 bytes | X coordinate |
X and Y coordinates
The position of the top-left corner of the sprite on screen. You need to add 128 to both to get the value to write in the table (e.g. if you want to set the position at 40px, you need to write 40 + 128 = 168).
Tile number and flags
The "base" tile number for the sprite, from 0 to 2047. This is the number for the first tile, the sprite will use consecutive tiles starting from this one. You can OR this value with some flags to apply special effects.
Sprite size
The size of the sprite. Bits 3-2 are the width of the sprite, bits 1-0
are the height of the sprite. Take the size in tiles then substract one
(i.e. 00 is 1 tile, 11 is 4 tiles).
Better yet, just use one of these:
; Name is SPR_*x# where * is the
; width and # is the height

SPR_1x1:  equ %0000  ; 1x1 tiles
SPR_2x1:  equ %0100  ; 2x1 tiles
SPR_3x1:  equ %1000  ; 3x1 tiles
SPR_4x1:  equ %1100  ; 4x1 tiles
SPR_1x2:  equ %0001  ; 1x2 tiles
SPR_2x2:  equ %0101  ; 2x2 tiles
SPR_3x2:  equ %1001  ; 3x2 tiles
SPR_4x2:  equ %1101  ; 4x2 tiles
SPR_1x3:  equ %0010  ; 1x3 tiles
SPR_2x3:  equ %0110  ; 2x3 tiles
SPR_3x3:  equ %1010  ; 3x3 tiles
SPR_4x3:  equ %1110  ; 4x3 tiles
SPR_1x4:  equ %0011  ; 1x4 tiles
SPR_2x4:  equ %0111  ; 2x4 tiles
SPR_3x4:  equ %1011  ; 3x4 tiles
SPR_4x4:  equ %1111  ; 4x4 tiles
Next sprite number
For our case, just slap the sprite number plus one (i.e. 1 for first sprite, 2 for second sprite, etc.), except for the last sprite, where you'll put 0 in it. Easiest way to do this is to always write 0 for a new sprite and rewrite this number for the previous sprite (if any).
If you want to understand better what's going on, check the sprite link section of the sprite table reference.
Wrapping up
To give an idea of how the subroutine would look like…
; d0 = X coordinate
; d1 = Y coordinate
; d2 = tile + flags
; d3 = sprite size

AddSprite:
    ; Don't bother if off-screen
    cmp.w   #SCREEN_W, d0     ; Too far right?
    bge.s   @Skip
    cmp.w   #-32, d0          ; Too far left?
    ble.s   @Skip
    cmp.w   #SCREEN_H, d1     ; Too far down?
    bge.s   @Skip
    cmp.w   #-32, d1          ; Too far up?
    ble.s   @Skip

    ; Get pointer to sprite table
    lea     (SpriteTable), a0

    ; Check sprite count
    move.b  (NumSprites), d4  ; If 1st sprite, then skip
    beq.s   @First            ; most of this
    cmp.b   #MAX_SPRITES, d4  ; If too many sprites, then
    bhs.s   @Skip             ; don't draw this sprite

    ; Get pointer to new entry
    moveq   #0, d5
    move.b  d4, d5
    lsl.w   #3, d5
    lea     (a0,d5.w), a0

    ; Update the link of the last sprite
    ; to point to the one we're inserting
    move.b  d4, -5(a0)

@First:
    ; Coordinates are offset by 128
    add.w   #128, d0
    add.w   #128, d1

    ; Store the entry
    move.w  d1, (a0)+   ; Y coordinate
    move.b  d3, (a0)+   ; Sprite size
    move.b  #0, (a0)+   ; Sprite link
    move.w  d2, (a0)+   ; Tile + flags
    move.w  d0, (a0)+   ; X coordinate

    ; Update sprite count
    addq.b  #1, d4
    move.b  d4, (NumSprites)

@Skip:
rtsStep 3: upload table to video memory
Once you're done adding all the sprites, it's time to copy the table to video memory.
First determine the length:
- If there are no sprites, it's 8 bytes
- Otherwise, it's number of sprites × 8 bytes
You need to always upload at least the first entry, since it's always used. If you're showing no sprites, we have to push it away and cut the table short there (this is why we fill that entry with 0 when we clear the table). The first point above ensures this.
Anyway: now copy the table to video memory (where you had set it with the relevant video register). Use a loop or DMA or whatever. Make sure to do this during vblank though (like any large writes you write to video memory).
Uploading the table the easy way
Ideally you should have already a way to copy the table quickly to VRAM (e.g. DMA transfers), but if you're just getting started and need something quick you could copy the table manually with a simple loop.
We're gonna use the SetVramAddr macro from the page about
writing to video memory.
Now we copy it manually using a loop (remember this works by writing
everything into VdpData). If there are sprites we copy all
the entries as-is, while if the aren't sprites we overwrite the first
entry (in VRAM) with zeroes (that'll push everything away).
UpdateSprites:
    lea     (SpriteTable), a0
    lea     (VdpData), a1

    ; Tell VDP where we'll write
    SetVramAddr SPRITE_ADDR

    ; Check how many sprites are there (note
    ; the moveq to extend to a larger size)
    moveq   #0, d0
    move.b  (NumSprites), d0
    beq.s   @Empty

    ; Copy every sprite into VRAM
    ; Every entry is 8 bytes (two longwords)
    ; so we just do two long writes for each
    ; sprite to make it simpler
    subq.w  #1, d0
@Loop:
    move.l  (a0)+, (a1)
    move.l  (a0)+, (a1)
    dbf     d0, @Loop
    rts

    ; If we get here, the table has no sprites
    ; Fill first entry with zeroes (which happens
    ; to be d0's value, so we reuse that)
@Empty:
    move.l  d0, (a1)
    move.l  d0, (a1)
rtsLarge sprites
Sprites can be up to 32px large, but often you see larger sprites in games. How?
While the Mega Drive can't show larger sprites per-se, you can split a large graphic into several smaller sprites (you can even reuse graphics to save memory). For example, the graphic below is split into four smaller sprites (marked by the red boxes).

Sprite limits
There's a limit to how many sprites the video hardware can handle. Moreover, the sprite limit is directly proportional to the screen resolution (specifically, the width).
For 320px wide resolutions:
- Up to 80 sprites on screen
- Up to 20 sprites per line
- Up to 320 sprite pixels per line
For 256px wide resolutions:
- Up to 64 sprites on screen
- Up to 16 sprites per line
- Up to 256 sprite pixels per line
Beware of sprite cache
This is a warning for those who try to be clever by messing with the sprite table address (if you just set it once or always rewrite the table after changing it, this is not for you).
You can change the sprite table address at any time, but beware that there's a sprite cache. This cache holds the Y coordinate as well as sprite sizes and their order, but not the X coordinate and tile number + flags. The cache is flushed whenever you write to the sprite table, no matter how long it takes.
If you write a whole new table, this isn't a problem. But if you change the sprite address without writing new sprites, the cached values will be used and you'll end up with half the data from the old table and half the data from the new table.
Note that this can be exploited. Castlevania Bloodlines exploits this for a reflection effect by changing the sprite table in the middle of the screen (giving the sprites new X coordinate and tile number). And in Dragon's Castle this is exploited to allow underwater sprites to use a different palette without having to rewrite the whole table.