Controllers
The main input device for the Mega Drive and the one you can expect everybody to have.
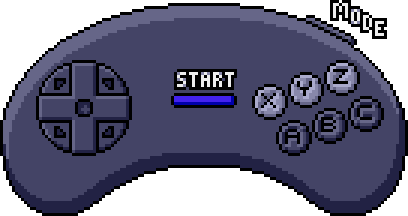
Note that there are two controllers: the original big 3-button controller (with D-pad, A, B, C and Start) and the later smaller 6-button controller (which adds X, Y, Z and Mode). Both types of controllers are explained here.
- Setting up
- Reading the buttons
- Check when a button just went down
- Checking if there's a controller
- 6-button controller
- Troubleshooting
- Button layout
Setting up
Before using the controllers first we have to set up the ports.
Each controller port has two addresses: the "control port" (used to define how signals are sent) and "data port" (the one we use to actually send data back and forth), as explained in the I/O ports page.
| Port | Player 1 | Player 2 |
|---|---|---|
| Data port | $A10003 | $A10005
|
| Control port | $A10009 | $A1000B
|
The I/O ports page include these constants for 68000 assembly that we're going to use:
IoCtrl1: equ $A10009   ; 1P control port
IoCtrl2: equ $A1000B   ; 2P control port
IoData1: equ $A10003   ; 1P data port
IoData2: equ $A10005   ; 2P data port
To set up the controllers, you have to write $40 to both
control and data port. You may want to do this early in the program
(before e.g. setting up the video hardware and such) to give time for
the controllers to get ready.
Something important: we need to prevent the Z80 from accessing the 68000 bus while we're touching these ports (due to a hardware bug). The easiest way is to halt the Z80 while we're doing it. Remember that if the Z80 isn't running, it's still safe to do a Z80 bus request since the Z80 is still being reset anyway.
Anyway, here's how it'd look like:
    FastPauseZ80
    move.b  #$40, (IoCtrl1)   ; 1P control port
    move.b  #$40, (IoData1)   ; 1P data port
    move.b  #$40, (IoCtrl2)   ; 2P control port
    move.b  #$40, (IoData2)   ; 2P data port
    ResumeZ80
That's all.
Reading the buttons
Now we can start using the controllers. The optimal way to do things is to read the buttons once every frame, store the result somewhere in RAM and let the rest of the game look there. This also avoids issues with 6-button controllers (see warning below).
For this you need the data port (IoData1 or
IoData2). Reading the buttons is a two step process: first
write $40 to the data port, wait a bit (a few nop will do), then read back a byte from the port. Then write
$00 and do the same.
- Write
$40, wait a bit, read back - Write
$00, wait a bit, read back
Bits 5-0 from each read includes the current state of the buttons, where
each bit belongs to a button (and yes, up/down show up twice). A bit =
1 means the button is not pressed, a bit =
0 means it's pressed. Refer to the table below to check
which bit is each button.
| Bit 5 | Bit 4 | Bit 3 | Bit 2 | Bit 1 | Bit 0 | |
|---|---|---|---|---|---|---|
1st step (write $40)
| C
| B
| Right
| Left
| Down
| Up
|
2nd step (write $00)
| Start
| A
| 0
| 0
| Down
| Up
|
You may want to rearrange the bits in a more convenient way. A common
scheme is called "SACBRLDU" (from the button initials),
where bits 5-0 from the 1st step are left in their place and bits 5-4
from the 2nd step are moved to bits 7-6.
| Bit 7 | Bit 6 | Bit 5 | Bit 4 | Bit 3 | Bit 2 | Bit 1 | Bit 0 |
|---|---|---|---|---|---|---|---|
Start
| A
| C
| B
| Right
| Left
| Down
| Up
|
Example assembly code to give an idea:
    ; a0 = IoData1 for player 1
    ;    = IoData2 for player 2

    FastPauseZ80        ; Pause Z80 for a bit

    move.b  #$40, (a0)  ; Do 1st step
    nop                 ; D-pad, B and C
    nop
    nop
    nop
    move.b  (a0), d0

    move.b  #$00, (a0)  ; Do 2nd step
    nop                 ; A and Start
    nop
    nop
    nop
    move.b  (a0), d1

    ResumeZ80           ; Z80 can run now

    and.b   #$3F, d0    ; Rearrange bits
    and.b   #$30, d1    ; into SACBRLDU
    lsl.b   #2, d1
    or.b    d1, d0

    ; Now d0 contains all the buttons
    ; May want to use a NOT if you prefer
    ; 1 = pressed and 0 = released
Do not read the controllers more than once per frame! Doing so will break 6-button controllers which rely on timing to provide their backwards compatibility. Instead store the result somewhere in RAM and let the game look there.
Check when a button just went down
The above is enough to know if a button is being held down (e.g. hold down the D-pad to run). But what about actions that should only take effect once when you just press the button, instead of every frame?
For this, you need to keep track of the buttons as they were in the last frame. Then (maybe in the same routine that reads the controller!) you can check if a button was just pressed by comparing it against the current frame:
just_pressed = pressed_now and (not pressed_before)You can also check if a button just got released by doing it the other way:
just_released = (not pressed_now) and pressed_beforeAnother remark: humans are not perfect and hence you can't expect them to press two buttons at the same time (this includes diagonals too). If your game absolutely needs this, then make sure to include some sort of grace period so it still works as long as the two buttons are pressed within a few frames.
Checking if there's a controller
If there's nothing in the port it should look as if no buttons are pressed, so normally you don't have to bother with this.
If you want to check if there's a controller however (e.g. to disable a
"2 players" option if there's only one controller), look at bits 3-2 from
the second step: they should be 00. If they aren't,
then it means there isn't a controller plugged in.
6-button controller
Reading the 6-button controller is done in a similar way to the 3-button
one. The main difference is that instead of writing to the port twice,
we write to it seven times (alternating between writing
$40 and $00):
| Bit 5 | Bit 4 | Bit 3 | Bit 2 | Bit 1 | Bit 0 | |
|---|---|---|---|---|---|---|
1st step (write $40)
| C
| B
| Right
| Left
| Down
| Up
|
2nd step (write $00)
| Start
| A
| 0
| 0
| Down
| Up
|
3rd step (write $40)
| C
| B
| Right
| Left
| Down
| Up
|
4th step (write $00)
| Start
| A
| 0
| 0
| Down
| Up
|
5th step (write $40)
| C
| B
| Right
| Left
| Down
| Up
|
6th step (write $00)
| Start
| A
| 0
| 0
| 0
| 0
|
7th step (write $40)
| C
| B
| Mode
| X
| Y
| Z
|
1st and 2nd steps are as usual. 3rd, 4th and 5th steps are for compatibility only and you can ignore their values (i.e. do the writes without the reads).
6th step is the important one: it tells you if a 3-button controller
is in use. If bits 3-0 are not 0000, then you can
assume it's a 3-button controller and stop here. If they are,
however, proceed to the 7th step to read the extra buttons.
In other words:
- Do 1st and 2nd steps (D-pad, A/B/C, Start)
- Do 3rd, 4th and 5th steps (ignore their input)
- Do 6th step and check bits 3-0
- If it is
0000, do 7th step (X/Y/Z, Mode) - If it isn't
0000, it's a 3-button controller
- If it is
Do not read the controllers more often than once per frame! Their backwards compatibility relies on timing and reading them too often will make them return the wrong values. Instead store the result somewhere in RAM and let the game look there.
Do not do anything that requires holding down the Mode button when turning on the console, since that's how 6-button controllers go into 3-button compatibility mode. Similarly, don't do anything that requires pressing Mode+X+C (which does the same for wireless controllers). Pressing the Mode button after power on is fine.
Troubleshooting
Remember to always check if the controller works with other games! It's perfectly possible that a controller is broken (e.g. if some pin is broken, some buttons may not work or act as if another button was pressed too), as well as that player port. Only start troubleshooting if you know for sure that the controller works.
B and C also trigger A and Start
Make sure that the controller has been setup correctly, and that you're toggling the data port correctly as well. If you're sure it's correct (especially if it does work in an emulator) then it's possible the controller is broken (certain pin breaking will cause this). Check it in other games to make sure.
6-button controllers act weird
Did you heed the warning about reading them only once per frame? Make sure to read the controllers when the frame starts, store the buttons somewhere in RAM and let the rest of the game rely on that.
Also 6-button controllers are a lot more picky about the delay between the write to the data port and reading back from it, so make sure to get this part right as well.
The X and Z buttons are swapped
Check the 6-button table again. X is in bit 2 and Z in bit 0. It's easy to miss this detail.
Button layout
3-button controller

6-button controller
Remarks:
- The model 3 style controllers put both Start and Mode in the middle (which one is on the left and which one on the right may depend on the controller).
- A few unofficial controllers may lack the Mode button.